

How to Add Google Tag Manager in 5 Easy Steps
What Is Google Tag Manager and Why Should You Use It?

Google Tag Manager (GTM) is a free tag management system that centralizes all your website's marketing and analytics tags into a single management interface. Instead of adding individual JavaScript snippets directly into your website's source code whenever you want to track a button click, form submission, or conversion, you install one main GTM container script on your site.
Once that container is in place, you can configure, manage, and update client-side tagging for tools like Google Analytics 4, Google Ads, Meta Pixel, and third-party tracking scripts entirely within the Tag Manager interface.
Why You Should Add Google Tag Manager
Choosing to add Google Tag Manager delivers several immediate operational advantages for both marketing and technical teams:
Code-free deployment: Marketers can configure and launch new tracking pixels without opening a single HTML file or waiting on development sprints.
Site speed optimization: GTM loads scripts asynchronously, meaning third-party tags won't hold up the rendering of your primary website content.
Marketing agility: Rapidly spin up promotional campaigns, event tracking, and retargeting pixels in minutes rather than weeks.
Built-in error checking and version control: GTM keeps a complete history of changes so you can instantly rollback if something breaks.
For a broader look at advanced architectures, explore our Google Tag Manager Complete Guide 2026.
Step 1: Create an Account and Container
Setting up GTM starts in the Google Tag Manager platform. Before pasting code onto your server, you need to set up your organizational hierarchy.
Setting Up Account and Web Container
Navigate to tagmanager.google.com and sign in using your business's primary Google account.
Click Create Account.
Enter an Account Name (typically your company name).
Select your Country location.
Configure your Container. A container holds all the tags, triggers, and variables for a specific property. Use your root domain URL (e.g., www.example.com) as the Container name.
Under Target platform, select Web. (GTM also supports iOS, Android, AMP, and Server containers, but Web is standard for desktop and mobile websites).
Accept the Terms of Service.

A single web container is designed to cover your entire website — you do not need to create separate containers for different pages on the same domain.
Finding Your Container Code Snippets
Once your container is created, GTM will immediately pop up the Install Google Tag Manager dialog box. If you close this window by mistake, you can always access it again in your GTM workspace by clicking on your unique Container ID (formatted as GTM-XXXXXXX) in the top navigation panel, or by clicking Admin > Install Google Tag Manager.
You will see two distinct code snippets:
The Head Script: A JavaScript code block that handles dynamic script injection and data collection.
The Body NoScript: An HTML iframe fallback designed to track basic pageviews if a user has JavaScript disabled in their browser.
Step 2: Add Google Tag Manager Code Snippets to Your Site
Now that you have your code snippets, the next step is adding them to your website's template or codebase.
Best Practices for Placing Snippets in Head vs Body
Proper HTML placement ensures your tags fire accurately without negatively impacting DOM structure or site performance:
Place the JavaScript snippet high in the <head>: Paste the first code snippet as close to the top of your website's <head> tag as possible (immediately after the opening <head> tag). Placing it high in the head section allows GTM to initialize early during page load. This captures crucial interaction and pageview data even if a visitor bounces quickly before the rest of the page fully renders.
Place the <noscript> snippet immediately after the opening <body> tag: Paste the second code snippet right after the opening <body> tag.
Why split them up? Placing an iframe tag (which is what <noscript> contains) inside the <head> section breaks standard HTML compliance rules. Keeping the main script in the <head> guarantees fast execution, while keeping the <noscript> tag inside the <body> keeps your code valid.
If you are automating complex workflows, check out our Google Tag Manager Automation Guide.
How to Add Google Tag Manager on WordPress and Shopify
If you manage your site through a Content Management System (CMS), installing GTM is simple and usually doesn't require editing core theme files directly.

WordPress
While you can edit your theme's header.php file directly, standard theme updates can overwrite your code. Instead, use a dedicated plugin:
Install a trusted plugin like GTM4WP.
Enter your GTM Container ID (GTM-XXXXXXX) in the plugin settings.
Choose the container placement method recommended by the plugin.
For full, step-by-step WordPress instructions, read our guide on how to Add Google Tag Manager to a WordPress Site.
Shopify
Shopify stores allow straightforward container integration:
Log into your Shopify admin panel.
Navigate to Online Store > Themes > Edit Code.
Locate your theme.liquid file.
Paste the <script> GTM snippet right below the opening <head> tag, and the <noscript> snippet right below the opening <body> tag.
Click Save.
For custom store architecture setup, view our guide on how to Add Google Tag Manager to a Shopify Store.
Step 3: Configure the Data Layer and Your First Google Tag
With snippets safely embedded on your site, you can now construct your measurement environment using the Data Layer and configure your core Google tag.
Setting Up the Data Layer
To set up a custom data layer, place your data layer script array above the main GTM head code snippet in your website's HTML source code:
Placing the data layer array above the GTM container script guarantees those dynamic properties are declared and accessible the exact instant GTM initializes.
Configuring the Google Tag in GTM
To pass baseline measurements into Google Analytics 4 or Google Ads, you must deploy a central Google tag in GTM.
In your GTM Workspace, navigate to Tags > New.
Click Tag Configuration and select Google Tag.
Enter your Tag ID (for GA4, this is your Measurement ID formatted as G-XXXXXXXXXX).
Under Triggering, choose Initialization - All Pages. Using the Initialization trigger ensures the Google tag loads before other dependent event tags execute.
Save your tag.
For additional platform configuration, refer to official documentation on how to Set up your Google tag in Google Tag Manager or review our walkthrough on Adding Google Analytics 4 to a Site Using GTM.
Step 4: Set Up Triggers, Test, and Verify Installation
Never publish container changes directly to a live environment without thorough QA testing.
Testing with Preview Mode and Tag Assistant
GTM includes a built-in debugging engine called Tag Assistant.
In your GTM workspace, click Preview in the upper-right corner.
Enter your website URL and click Connect.
A new browser window will launch your site with Tag Assistant connected.
Return to the debug window to verify which tags fired successfully and review network payload details.

If you are using Squarespace or similar builders, see our specific Squarespace GTM Preview Mode Guide.
Creating Triggers and Publishing the Container
Triggers tell GTM when to fire specific tags (e.g., on specific pageviews, button clicks, or form submits).
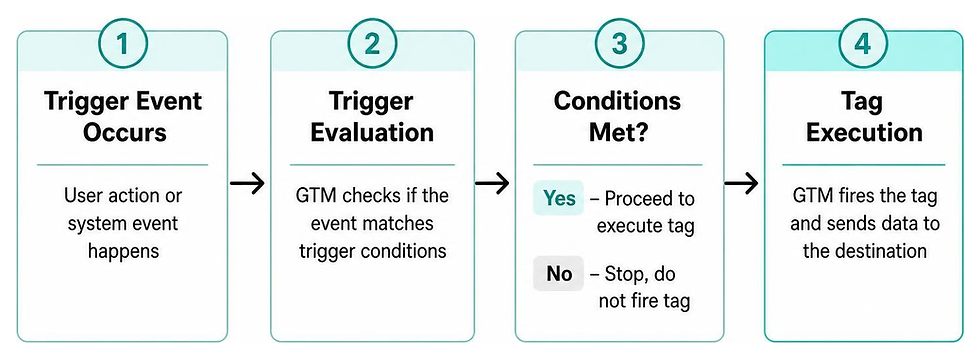
Once your tags and triggers test cleanly in Tag Assistant:
Click Submit in the main GTM workspace.
Choose Publish and Create Version.
Give your version a clear Version Name and Version Description (e.g., "Initial GTM setup with GA4 Google Tag").
Click Publish.
After publishing a new tag configuration, it can take up to 30 minutes for live analytics reports to reflect data collection across all properties.
Step 5: Avoid Common Mistakes When Installing GTM
Installing GTM is straightforward, but minor mistakes can cause missing or corrupted analytics data. Avoid these common pitfalls:
Pasting snippets into text editors that alter formatting: Copying code through rich-text applications (like Microsoft Word or certain email clients) converts standard straight quotes ("") into curly quotes (“”), breaking the JavaScript syntax. Always use plain text editors.
Leaving legacy hardcoded tags on your site: When migrating existing tags to GTM, remove the direct on-page scripts. Leaving hardcoded tracking scripts alongside GTM tags results in duplicate event metrics.
Placing both scripts together in the <head>: Putting the <noscript> iframe snippet inside the <head> section generates invalid HTML.
Here is a quick comparison of implementation options:
Feature / Aspect | Manual HTML Code Installation | CMS Plugin Setup |
Technical Difficulty | Moderate (Requires codebase access) | Low (No code editing required) |
Update Resilience | High (Stays intact across theme updates) | Depends on plugin updates |
Data Layer Support | Manual custom coding | Built-in automated features |
Best Used For | Custom web applications & platforms | WordPress, Shopify, Content sites |

Frequently Asked Questions About Google Tag Manager
Can I remove the <noscript> code snippet from my website?
Yes. The <noscript> code snippet is primarily a fallback mechanism designed to track basic pageviews for users who have disabled JavaScript in their browsers, as well as for verifying domain ownership in Google Search Console. Because the vast majority of web traffic relies on JavaScript, omitting the <noscript> tag will not disrupt normal GTM tracking or tag firing for standard visitors.
How long does it take for data collection to start after adding GTM?
While GTM executes container changes immediately upon publishing, it can take up to 30 minutes for processing systems in tools like Google Analytics 4 to display incoming event data in standard reports. You can verify immediate connectivity right away using GA4's Realtime report or Tag Assistant.
Do I need a separate GTM container for every web page?
No. A single GTM container is meant to be installed across every page of your domain. You manage distinct page-level tracking behaviors inside GTM using custom triggers rather than creating multiple containers.
Conclusion
When you add Google Tag Manager to your website, you replace tedious source code updates with a fast, scalable, and manageable tracking infrastructure. By following these 5 steps — creating your container, embedding the snippets correctly, configuring your data layer, and verifying with Tag Assistant — you set up a clean foundation for all your future marketing and analytics initiatives.
If you need help building out custom event architecture, server-side tagging, or platform integration, our team at S9 Consulting is ready to assist. Contact us today or review our step-by-step technical guide to Add Google Tag Manager to a Squarespace Website.


